Example Meeting Archive Listing
Meeting Archive - Full
This style displays all components of a Meeting including location, time, and a myriad of links and additional documents you'd like to archive regarding the meeting.
Minutes or Agenda Only
This style is much more simplified if your meetings are much more straightforward. If your meetings only consist of only minutes or only an Agenda, this is a great compact style to organize the meetings with the pertinent information and a link to that document.
Add a Meeting Archive
- Login into Drupal.
- Select the "Content" link from the top left of the Drupal Administrator Menu, then select the blue "+ Add Content" link.
- From the Add Content page, select "Meeting Archive". Alternatively you can go directly to the Create Meeting Archive page using this Create Meeting Archive link.
- You will be presented with several fields when you create your Meeting Archive:
- Title: The title of the Meeting Archive will not be shown on your page. The title will be used however if you need to update or remove the Meeting Archive in the future. Titles should be formatted as "<Name of Department> - <Meeting Date>".
- Calendar Year: This is helpful if you have a custom year drop down on your meeting archive usually when meetings begin to be numerous and overwhelm the page.
- Meeting Date & Time: The date & time of your meeting. Both date & time will be shown on your page and will be used to sort your Meeting Archives.
- Location: The location of your meeting. This field is displayed on your page and can be a physical location on campus such as a building, or can be a virtual locations such as Zoom. If a meeting was conducted over Zoom, please use the word "Zoom" in the Location field and not the actual Zoom meeting URL.
- Agenda: If your meeting had an agenda, it can be uploaded in this field. A link to the uploaded agenda will appear on your page.
- Minutes: If your meeting had minutes, it can be uploaded in this field. A link to the uploaded minutes will appear on your page.
- Handouts: If your meeting had a handout, it can be uploaded in this field. A link to the handout will appear on your page. You will be required to label your handout so make sure it is soemthing descriptive that would let a user know what they are about to click on. You can upload several handouts as well.
- Relevant Links: Any links relevant to your meeting. This can be a link to your Zoom meeting room or to external resources.
- Section Access: Lastly, enter the Section Access that is associated with your Meeting Archive and select the "Save" button which will save the Meeting Archive and publish it.
Edit or Remove a Meeting Archive
- Select the "Edit" button for the Meeting Archive you want to edit at the top right corner of the meeting. This will open the edit page.

- The edit page allows you to make updates to any field in the Meeting Archive. Once you have made the necessary changes select the "Save" button in the top right of the page to save your edits.
To remove a Meeting Archive from your website, select "Unpublish" from the dropdown in the right sidebar and Save the Meeting Archive to unpublish it and remove it from your website.
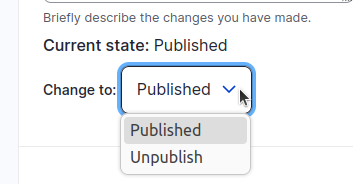
If you do not see the right side bar you may need to click to show side panel button in the top right next to the Save button: